One of the best ways to improve in any sport is to watch yourself on video. The ability to see yourself objectively is the most basic, true feedback. Add a little coaching, and you have a great combination for improvement. Underwater video analysis of swimmers is nothing new, but until recently, the equipment was costly and/or complicated. Now there are many ways to get high quality video without spending a lot of money. For 1000Swimmers “home grown” video analysis, we use the GoPro Hero 2 camera, and based on that experience, here are some tips that can save you time and money.
Beware of the Blur
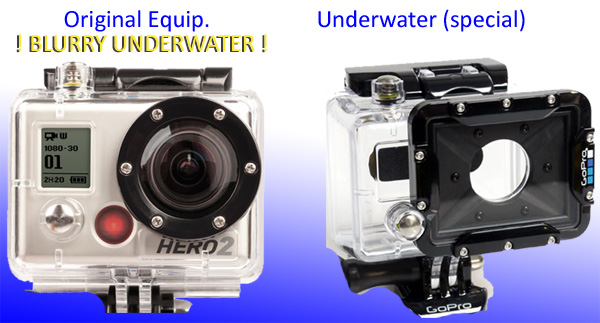
The Hero 2 camera is still for sale around $200 in all sorts of configurations with various accessories. But before you buy, you should be warned that the standard water-proof housing with a fish-eye lens does not take sharp images underwater!
Even though the housing is rated for 197 ft. (60 m.), any underwater images are blurred (see the video demo of the 2 housings). In the air, it works fine. The obvious question is, “Why bother with a waterproof housing when the images are poor?”
The Solution
For about $35 you can buy an improved waterproof housing. It has a flat lens cover. That is the setup that we use in the underwater analysis videos on this site. It will add about $35 to our cost, but then you still have the other housing for non-water shots.
Save the Packing !
The GoPro does not have a standard tripod mounting plate.The camera comes with a great deal of plastic packing pieces. One piece you should hang onto is the display pedestal. It serves as a basic mount for simple shots and makes it easier to hold without your hands getting in the picture. You can set it down in a calm area, such as the pool bottom and you’ll get great video.


